Vehicle 3D models (for 3D modelers)
This page is for 3D artists preparing a vehicle (truck, car, rover…) in Blender so the game can make it work: wheels that turn, a steering wheel that follows the steering, doors that open, and in-cab screens (reversing camera, mirrors, dashboard).
Read the general 3D models page first (LODs, textures, export). This page only adds the vehicle-specific rules.
The big idea: you provide the visuals, the game adds the gameplay
A vehicle in the game is your GLB model + a small rig the developers build in Godot.
- You (Blender) provide: the body, the wheels, the steering wheel, the doors (with their open/close animations) and the screen surfaces.
- The developers (Godot) add the gameplay nodes: physics wheels, cameras, seats, cargo zones, door handles, etc.
So your job is to deliver clean, well-named, well-pivoted parts. The game finds them by name.
Golden rule: one part = one object, correctly named, correctly pivoted
A part the game must move (a wheel, a door, the steering wheel) or target (a screen) must be a separate object in Blender — not a face buried in the body mesh. And its origin must be its pivot.
Naming (case doesn't matter)
| Part | Name it… | Notes |
|---|---|---|
| Body | anything (e.g. Carrosserie) | the main shell |
| Wheels | contains wheel → Front_l_wheel, Front_r_wheel, Rear_l_wheel, Rear_r_wheel | front/rear + l/r. Any number of wheels works. |
| Steering wheel | steering_wheel | the volant |
| Doors | ends with _door → Front_l_door, Front_r_door | one object per door |
| Reversing-cam screen | Recul_Screen | a flat screen surface |
| Mirror screens | RetroL_Screen, RetroD_Screen | left / right mirror |
| Dashboard screen | ScreenFront | shows speed / RPM / load |
| Collision pieces | start with col_ → col_cab, col_bed_floor, col_bed_left… | the physical shape (see Collision below). Several convex pieces. |
Origins = pivots (critical for moving parts)
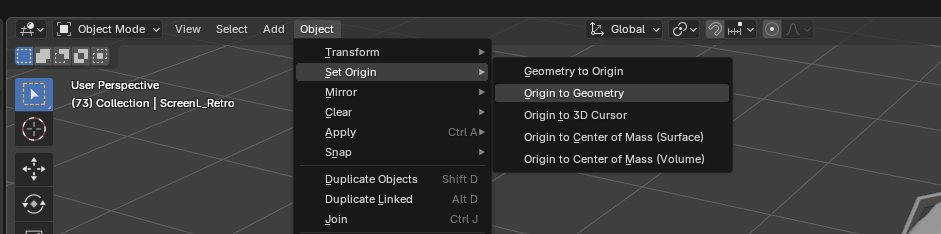
The object origin is the point a part rotates around. Set it with Object → Set Origin:
| Part | Origin must be at… |
|---|---|
| Wheel | the center of the axle (else the wheel wobbles when it spins) |
| Door | the hinge (else the door pivots through the air) |
| Steering wheel | the steering column axis |
| Screens / body | not critical — use Origin to Geometry for tidiness |
Set the origin from the Object → Set Origin menu:
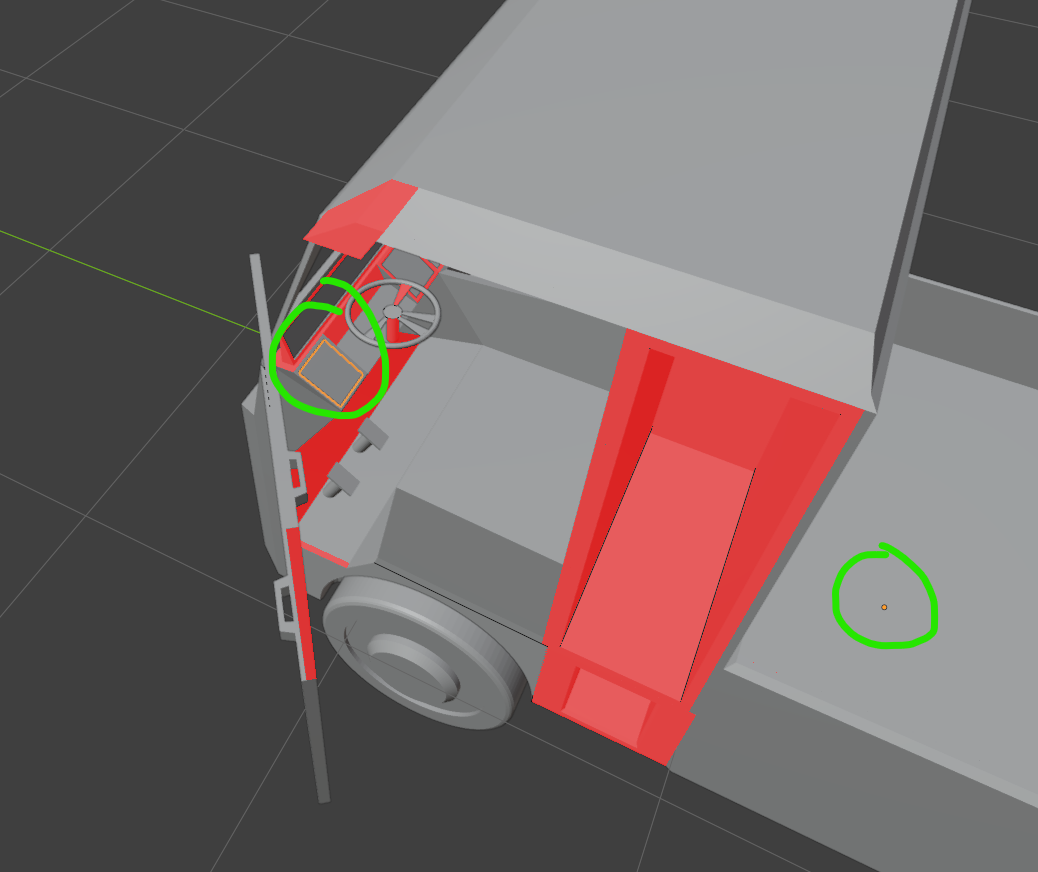
❌ Wrong — the origin sits far from the part (here at the body center), so the part pivots through the air:
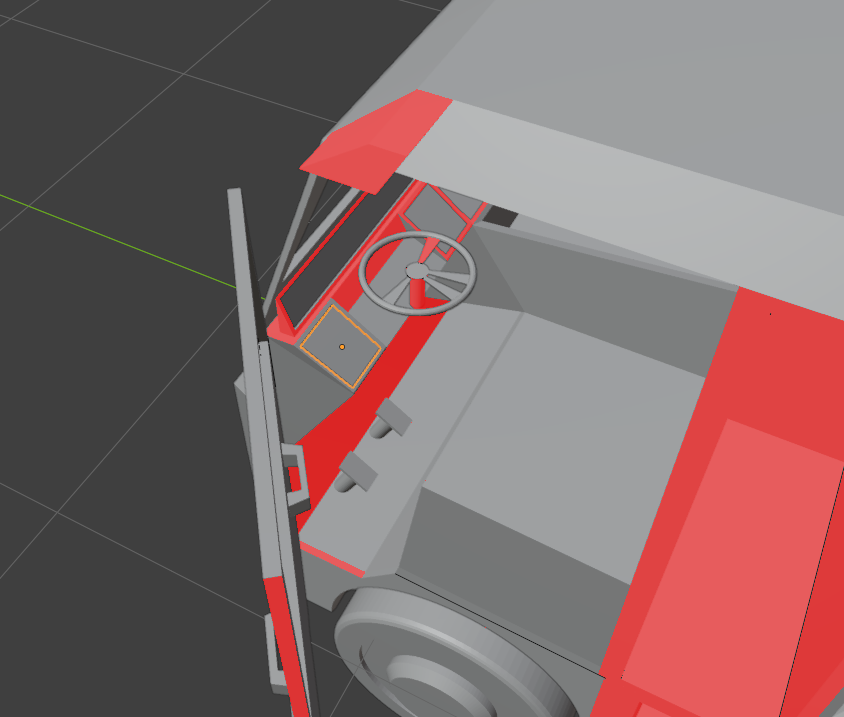
✅ Right — the origin is on the part's pivot (the wheel axle / the door hinge):
Before export, Ctrl+A → All Transforms on every object (bakes scale/rotation/position). A wrong
or unapplied scale is the #1 cause of parts arriving twisted or offset in the game.
One exception — the steering wheel of an angled column (see below): apply Location + Scale, but keep its Rotation (don't bake it), so its spin axis stays a clean local axis.
The game spins the steering wheel around one of its local axes, so that axis must stay aligned with
the column. Model the disc flat (its face in the local plane, normal along local Z), then
angle the wheel using the object's Rotation (e.g. 35° on X for a leaning column) — and do NOT
apply that rotation (Ctrl+A), or the tilt bakes into the geometry and the local axis no longer
follows the column. Check the N-panel → Item → Rotation shows your angle (not 0). The dev then
sets the spin axis in Godot — usually (0, 1, 0), because the glTF export turns Blender's Z-up into
Godot's Y-up so the disc normal (Blender +Z) becomes Godot +Y.
Unlike the steering wheel, the road wheels DO get all transforms applied (Ctrl+A → All), origin on
the axle center. Godot spins each wheel mesh around its local real_wheel_spin_axis — default
(1, 0, 0) (local X), where a Blender +Y-up glTF export usually leaves the axle. If the wheels end
up spinning "on their edge" (flipping over instead of rolling), the axle landed on a different local
axis after the apply — the dev just flips real_wheel_spin_axis in the vehicle's Inspector to the
matching cardinal axis. Model all wheels the same way so one axis is correct for all of them.
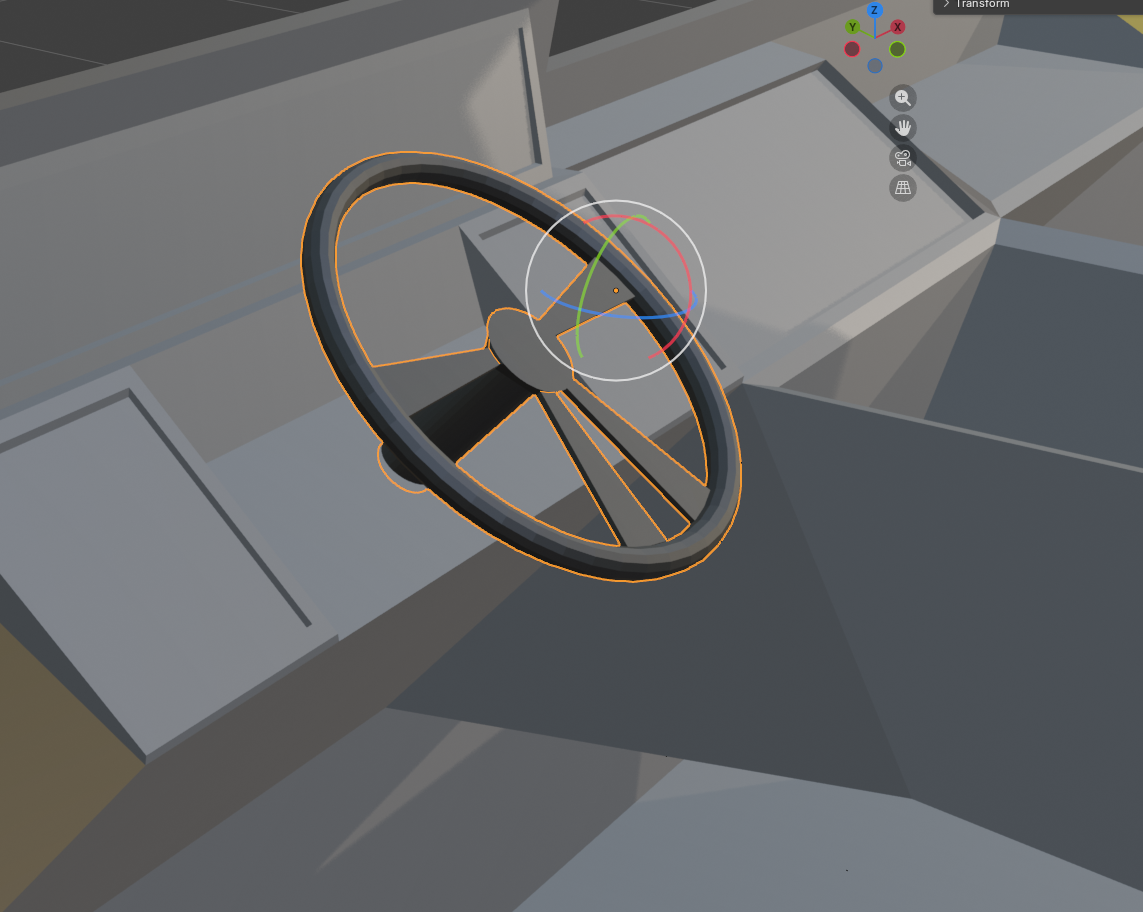
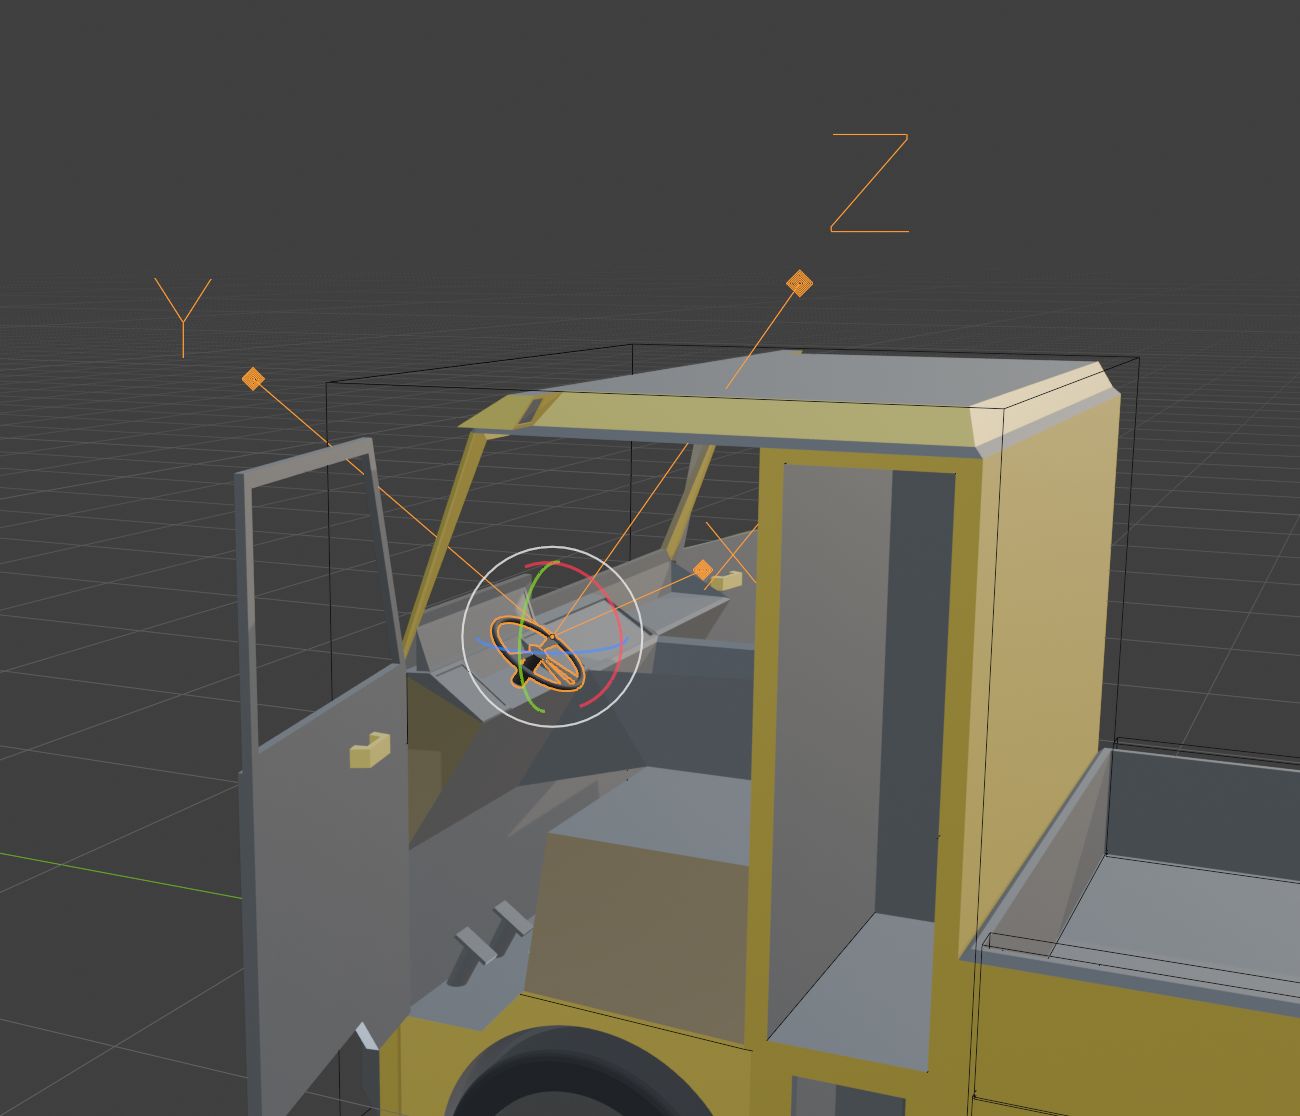
How to check it in Blender. Select the steering wheel, then switch the transform-orientation gizmo (top of the viewport header) between Global and Local to compare the two frames:
- In Global, the gizmo stays world-aligned (Z straight up). You can see the disc is tilted with respect to the world axes — that's expected for an angled column:
- In Local, the gizmo tilts with the object and follows the column. The disc normal is now a
clean local axis — this is the axis Godot spins the wheel around. If the gizmo is not tilted in
Local (it looks the same as Global), the rotation was baked with
Ctrl+Aand the local axis no longer follows the column — undo the apply and keep the Rotation instead:
Checking that your wheels sit where the physics rolls
Your wheel meshes are only the skin. The vehicle builds its own invisible wheel — a
VehicleWheel3D — and the model's mesh is reparented under it at runtime. If the two do not sit in
the same place, the truck rolls somewhere your eyes do not, and no amount of remodelling fixes it.
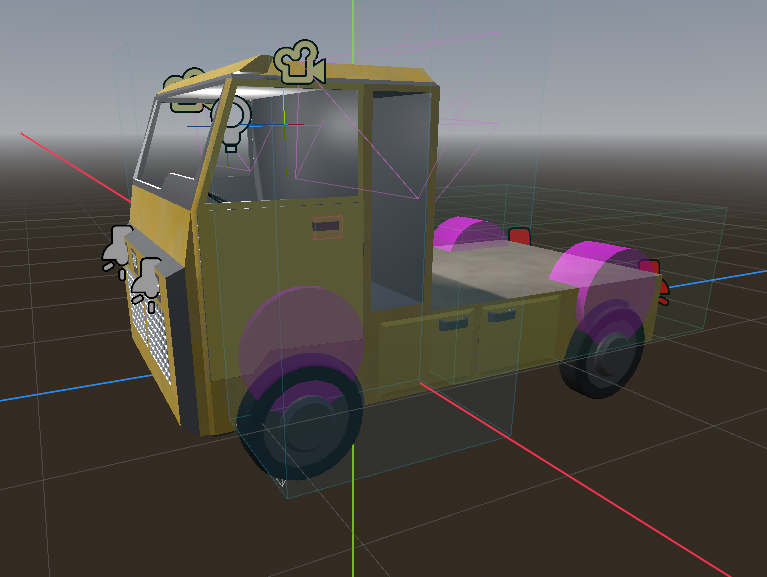
Tick Debug Show Physics Wheels on the vehicle (Inspector → Debug) and the simulated wheel is
drawn as a translucent magenta cylinder, at the physics radius, on top of your mesh.
⚠️ Where you look decides what it means
The physics of a networked vehicle runs on the server, which is headless. So the marker does not mean the same thing in the three places you might look at it:
| Where | Who places the wheel | What the marker shows |
|---|---|---|
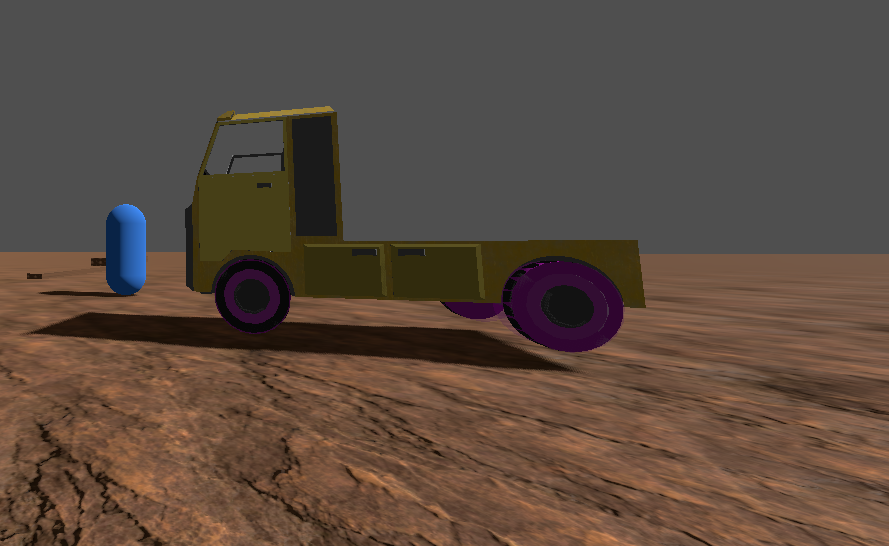
Bench scene (vehicle_bench.tscn, not networked) | the suspension — real physics | the simulated wheel. The only place the alignment can be judged |
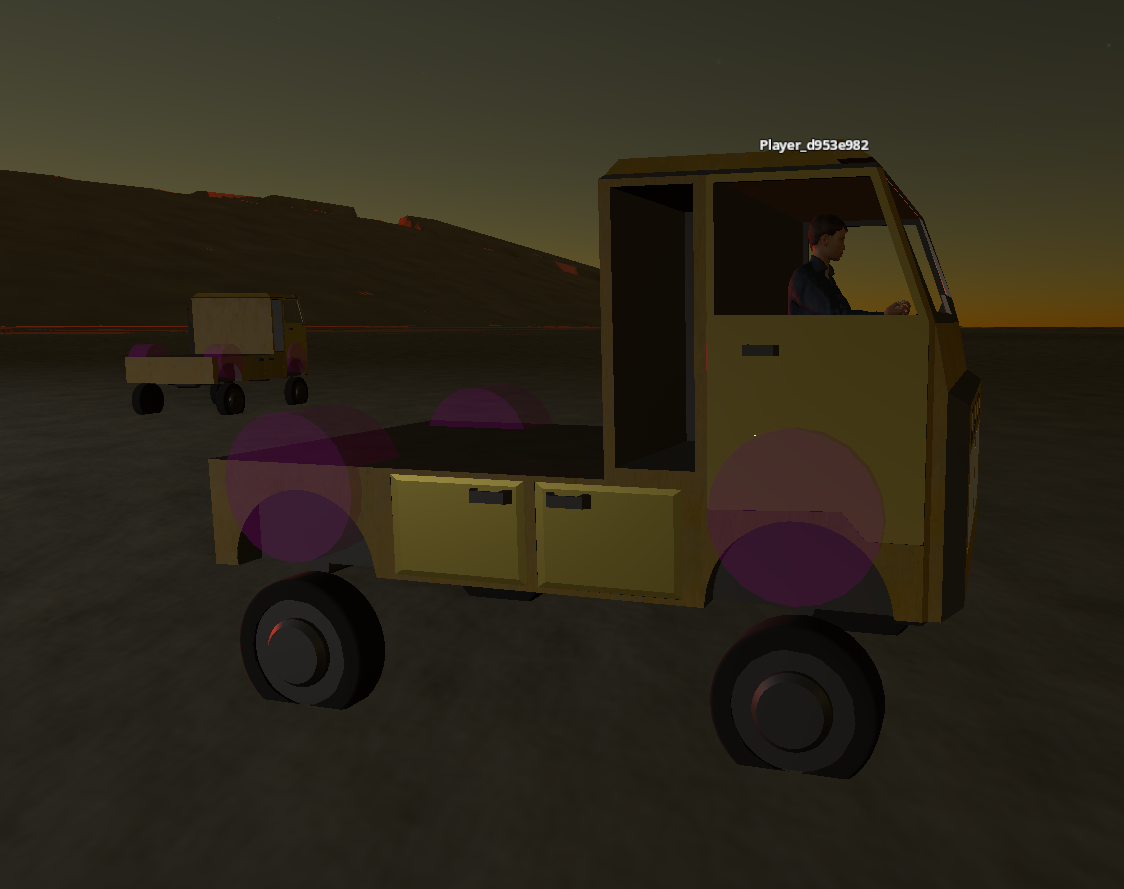
| In game, on any client (the driver included) | wheel_visual_drop, physics off | the suspension mount, sitting one rest length higher |
| Editor, scene not running | nothing — the mesh is not even reparented yet | the mount |
❌ In the editor, the marker floats above the wheel. This is correct and proves nothing:
❌ In game, same thing — every client sees a replica, so the marker is at the mount:
✅ In the bench, the physics runs and the marker lands on the wheel. This is the check:
Reading a mismatch at the bench
| What you see | What it means |
|---|---|
| The marker is bigger or smaller than your tyre | wheel_radius does not match the model. Measure your tyre and set it — it is the physics wheel, and it decides whether the vehicle climbs an obstacle or grounds on its chassis |
| The marker sits above or below by a constant amount | the mount, or suspension_rest. Ride height is suspension_rest + wheel_radius under the mount |
| They match at the bench but not in game | expected — see below |
Why the truck looks taller in game than at the bench
At the bench the suspension carries the weight: the body settles, the wheels ride up into their
arches, and the vehicle looks its proper height. On a client there is no physics at all, so
wheel_visual_drop places the wheel at one fixed height — the unloaded one. Every parked vehicle
is therefore drawn with its suspension fully extended, sitting high on its wheels like a car on a lift.
A replica cannot know how far the springs are squashed: that number only exists on the server, and replicating it per wheel would spend network traffic on decoration.
So tune wheel_visual_drop for the loaded stance, not the resting one: at the bench, measure how
far the body settles (call it s), then set it to suspension_rest − s. It is an eyeball setting, not
a calculation — judge it on a parked vehicle seen from another client, never on your own screen
while the bench is running.
It is one extra cylinder per wheel, drawn over your model. It is a diagnosis, not a feature.
Separating a part into its own object (P)
If a screen (or any part) is currently a face of the body:
- Edit Mode (
Tab) → select the face(s). P→ Selection → the face becomes a new object.- Back in Object Mode, rename the object (double-click in the Outliner, or
F2). ⚠️ Rename the object (top line), not just its mesh data underneath — the game uses the object name. - Set its origin and apply transforms (above).
Screens — the part with the most rules
A screen (reversing cam, mirror, or dashboard) shows a live image (a camera feed or the dashboard). The image is mapped onto the face through its UVs, so the UVs must be right.
1. One UV map only
A separated object often inherits two UV maps (e.g. UVMap and CarteUV). The export keeps
the one flagged render (the camera icon in Object Data Properties → UV Maps) — which may not
be the one you edited, so your work seems to "disappear" on export.
➡️ Keep one UV map: select the extra one → – to delete it. (When you P-separate a part it
drags along the body's UV maps — remove the duplicate every time.)
2. Fill the 0→1 square with U → Reset
For a flat quad screen, don't use Unwrap (it keeps the real aspect → leaves margins). Use:
Edit Mode → select the face → U → Reset.
This maps the 4 corners of the face to the 4 corners of the UV square → the feed fills the whole
screen. Check in the UV Editor: the rectangle must cover the entire 0→1 square (not collapse to
a point — that means no real UVs).
This works even if your screen is rectangular (16:9, 4:3…). The UV square is just the mapping space; your face keeps its shape. The whole image simply fills the whole screen.
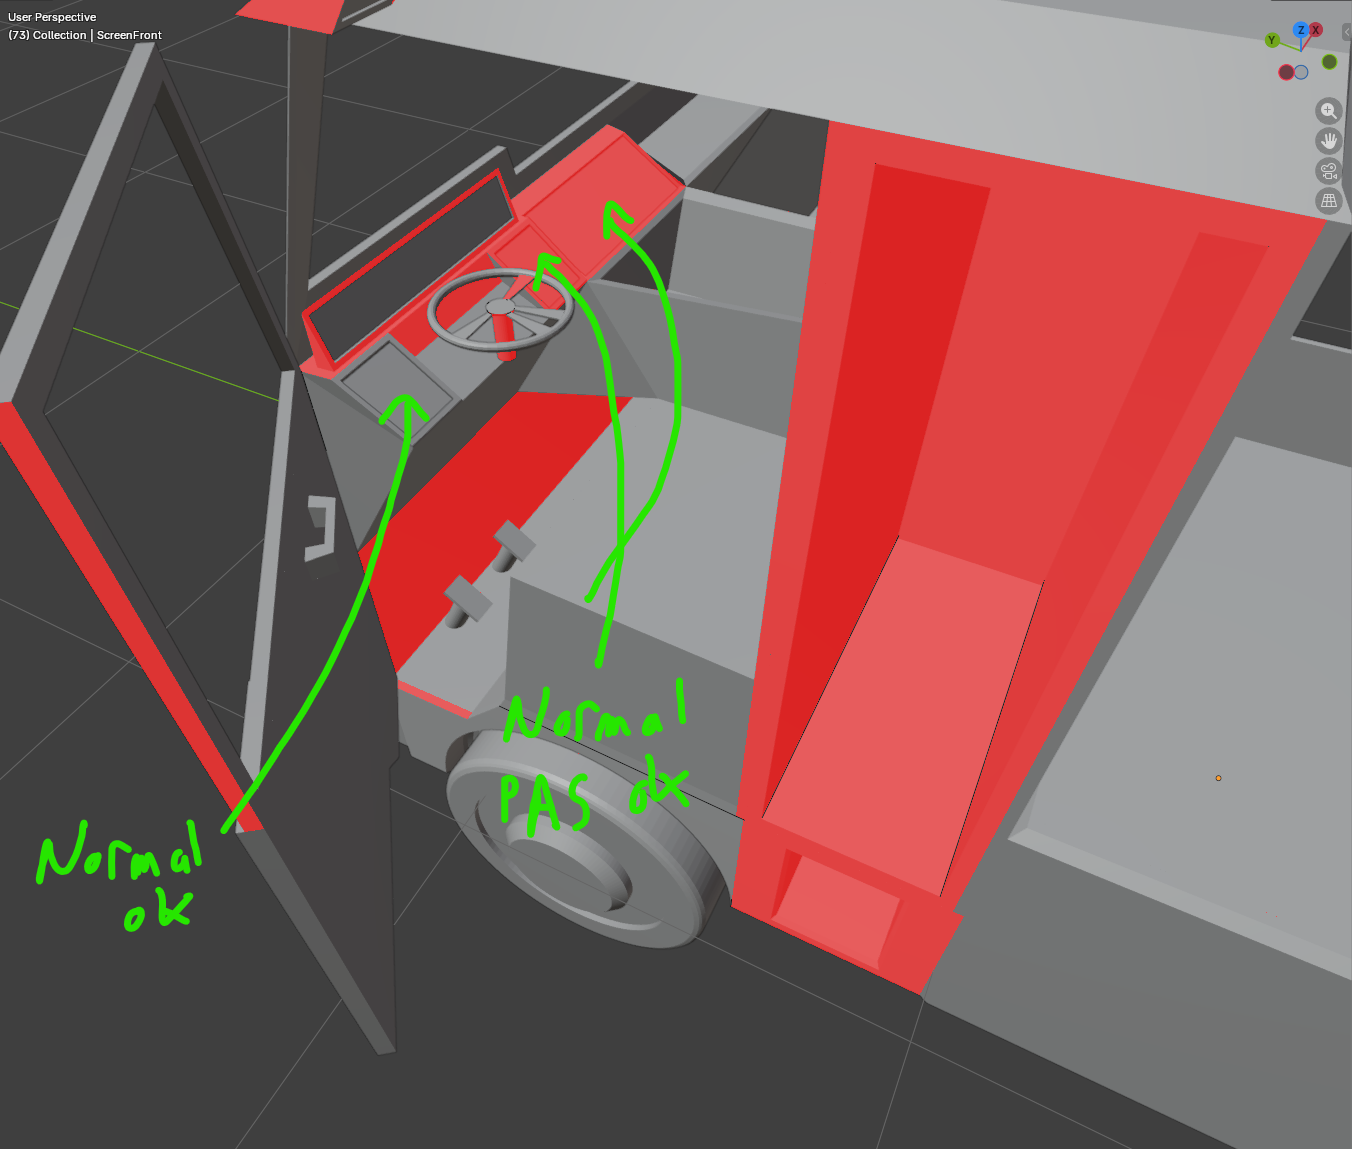
3. The front face must face the viewer (normals)
Screens are one-sided for performance: the image shows only on the face's front. If a screen is blank, its front points the wrong way.
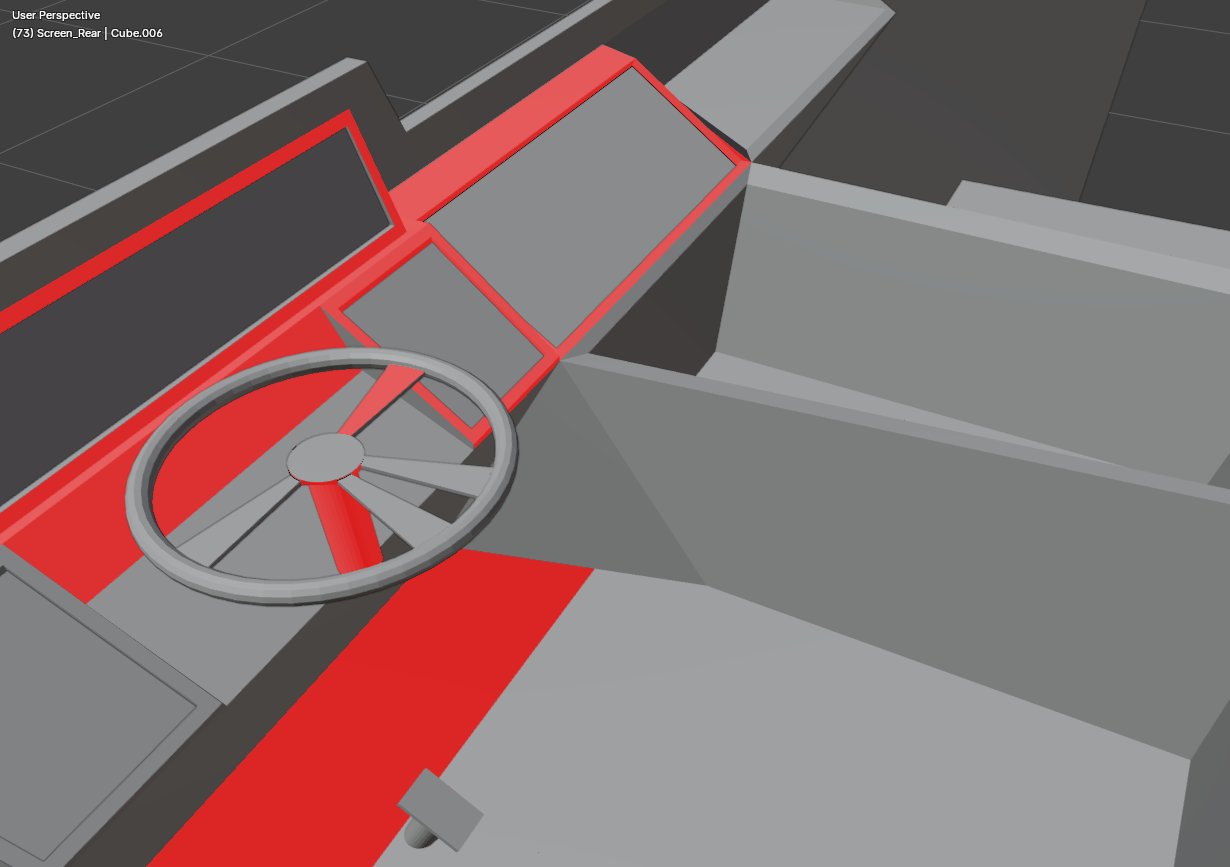
- Turn on Overlays → Face Orientation: blue = front, red = back.
- From the driver's viewpoint, each screen must be blue. If it's red → Edit Mode → select the
face →
Alt+N → Flip.
❌ Wrong — the screen face shows red (back) toward the viewer → it stays blank in game:
✅ Right — the screen face shows blue (front) toward the viewer → the feed displays:
4. If the image is rotated ("lying down")
The feed is upright along the UV's vertical. U → Reset fills the square but has no notion of "up" —
it maps the corners in the face's own vertex order — so a screen coming out sideways after a Reset is
expected, not a mistake.
Rotate the UVs: Edit Mode → select the face → hover the UV Editor → A to select its UVs →
R 90 (or 180 / -90) until it's straight.
If the pivot is the 2D cursor and the cursor is not at the centre of the square, the rotation walks
the UVs off the 0→1 square — which silently undoes the Reset you just did, and the screen goes
back to showing one magnified corner of the feed. With the pivot on Median Point a square rotated by
90° lands back on itself exactly.
Check after rotating: the quad must still cover the whole square, same four corners, just permuted. Rotate in the UV Editor, never in the 3D viewport — there you would be turning the screen itself.
Do it screen by screen: each face was built on its own, so the angle is not necessarily the same for all of them.
Doors — animations
Doors open/close via animations baked in the GLB. In Blender, animate each door (opening on its
hinge) and put the clips on the NLA editor as strips named <door>_open and <door>_close,
e.g. Front_l_door_open / Front_l_door_close. The export turns NLA strips into named animations the
game plays on demand.
(If a door has no animation, the game falls back to rotating it on its hinge — so the origin-at-the- hinge rule still matters.)
Collision — the physical shape (so players don't pass through)
The visible mesh has no collision by itself. You provide the physical shape as simple low-poly volumes, and the game turns each into a collider. Without them the game falls back to a rough box that won't match your model.
The one rule: each piece must be CONVEX
A moving vehicle can only use convex collision shapes (no dents/hollows in a single piece). The game takes the convex hull of each collision mesh — so a single U-shaped mesh around a truck bed would get filled in (you couldn't drop cargo in it). The fix: build the shape from several convex pieces.
How to do it in Blender
- Add simple primitives (mostly cubes) and shape them to wrap the vehicle: one for the cab, a flat one for the bed floor, thin ones for the bed walls (left / right / front), one for the hood… Keep them low-poly — a collider needs no detail.
- To keep a hollow bed, use the floor + wall pieces around the opening (never one big block over the bed).
- Name each piece
col_<something>—col_cab,col_bed_floor,col_bed_left,col_bed_right,col_bed_front,col_hood… - Apply transforms (
Ctrl+A → All Transforms), like every part. - Display them as wireframe so they stop hiding your model while you work: select the piece → Object Properties (the orange square) → Viewport Display → Display As → Wire. This is only a Blender display setting — the mesh still exports normally.
- No material / no UV needed.
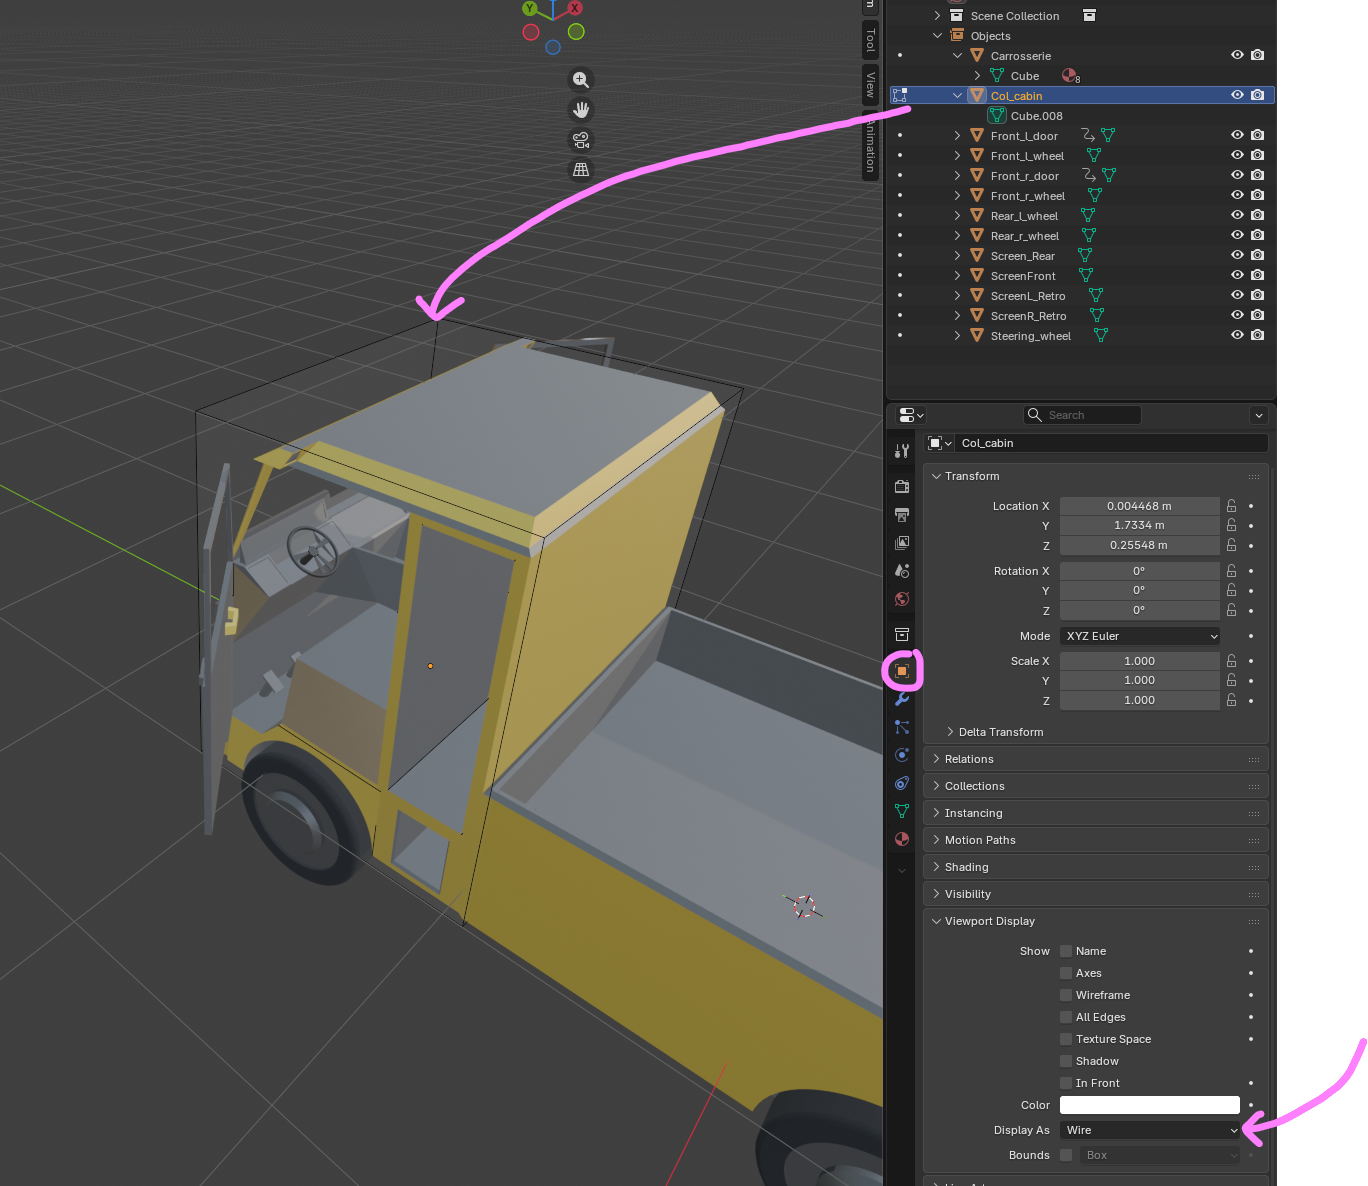
Each col_* piece becomes one convex collider in game, placed where you put it, and hidden — in
the Godot editor and in game (the integrator checks placement with Debug → Visible Collision
Shapes). If you ship no col_* piece, the game uses a rough fallback box (only good enough for a
blockout).
Why this approach (not auto-generated)
- Hand-made convex cubes are the game-industry standard for vehicles — clean, light and predictable. A handful of boxes is ~5 min of work and costs almost nothing at runtime.
- Automatic convex decomposition (V-HACD & co.) tends to spit out many messy pieces that need tuning — overkill for a vehicle, and heavier.
- A box is already convex — there is no "make it convex" button. You only avoid carving a single piece into a concave shape (a U / L / hollow): split it into several boxes instead, and the engine takes the convex hull of each.
- They are collision-only: no material, no UV, hidden everywhere — they exist purely so players and props can't pass through the body, while the bed stays hollow for cargo.
Export checklist
Use the Godot_export preset (File → Export → glTF 2.0 → Operator Presets). It already sets:
- glTF Binary (.glb), +Y up, Apply Modifiers, NLA strips ON (for door animations), Draco OFF.
Before exporting, per object:
- One separate object per moving/screen part, correctly named.
- Origin = pivot (axle / hinge / column).
-
Ctrl+A → All Transformsapplied. - One UV map (no duplicate); screens
U → Reset(fills 0→1). - Screen faces blue (front) toward the driver.
- Door animations as NLA strips
<door>_open/<door>_close. - Collision as several convex
col_*pieces (hollow bed = floor + walls, never one block). - No leftover modifier on screen objects —
Apply Modifiersbakes them on export and a stray modifier (Geometry Nodes, Weld…) can wreck the UVs. Apply or delete them first.
Common pitfalls (things that actually bit us)
| Symptom in game | Cause | Fix |
|---|---|---|
| Screen is blank / one color | UVs collapsed to a point, OR front face away from driver | U → Reset; flip normals (blue toward driver) |
| UV edits "disappear" on export | two UV maps, export used the other (render/camera icon) | keep one UV map |
| Screen image rotated / "lying down" | UV orientation | rotate UVs R 90 |
| Wheel/door pivots weirdly | origin not at the axle/hinge | Set Origin to the pivot |
| Part offset/twisted in game | transforms not applied | Ctrl+A → All Transforms |
| UVs reset to a point every export | a modifier baked on export | apply/remove the modifier (or recreate the screen as a fresh Plane) |
A screen is just a quad. If one keeps fighting you (degenerate UVs, stray modifier), the fastest fix
is to delete it and add a fresh Plane: place it, name it, set the front face toward the driver,
U → Reset. A new Plane has one clean UV map and no inherited junk.