Adding a vehicle
How DyingStar networking works explains the multiplayer basics in plain language. This is a step-by-step build guide — but good news: most of the time a new vehicle is just a scene to assemble, with little or no new code.
This guide walks through creating a new drivable vehicle (truck, car, rover…). Vehicles are server-authoritative networked props: the game server simulates the physics and replicates the state to every client, exactly like the other props (see Props network management). A vehicle adds two things on top: driving (a powertrain) and seats (driver / passengers).
All the moving parts already exist as reusable pieces — in most cases a new vehicle is just a scene to assemble, not new code.
The pieces
| Script | Role |
|---|---|
scenes/vehicles/vehicle.gd (class_name Vehicle) | The vehicle base: body/wheels, physics, driving, networking, cargo. Put it on the scene root. |
scenes/vehicles/vehicle_powertrain.gd | Engine math (electric / thermal gearbox). Owned by Vehicle, configured through its @exports — you don't touch it. |
scenes/vehicles/vehicle_seat.gd (class_name VehicleSeat) | One seat zone (driver or passenger). You drop one per seat. |
scenes/vehicles/vehicle_debug_hud.gd | Optional on-screen dashboard (speed, RPM, load). |
1. Where to put the files
- Scene:
scenes/vehicles/<category>/<name>.tscn(e.g.scenes/vehicles/trucks/truck.tscn). - Assets (3D model, materials, textures): follow the project conventions in Files structure and 3D models. Do not invent a new layout.
2. Build the scene
Create a scene whose root is a VehicleBody3D and attach vehicle.gd to it.
You have two options for the body:
- Real 3D model (GLB) — instance the artist's
.glbas a child of the root and add it to the groupvehicle_model. That switches the procedural blockout off automatically (no flag), andvehicle.gdwires the model's parts by name at runtime: wheels, steering wheel and doors. See Using a real 3D model below, and the modeler-facing Vehicle 3D models page for the naming / pivot / UV rules. - Parametric blockout (placeholder) — with no real model,
vehicle.gdgenerates a box-built body, chassis collision, four wheels, cameras and the cargo bay from its exported dimensions (@tool, so it rebuilds live in the editor). Tune it via the Body / Cab / Bed / Wheels export groups, and carve the cab opening with Cab → Cab Cutout Size / Offset.
The blockout is not just a leftover — it's the "design without a GLB yet" path. A developer can
create a new vehicle (rover, car, bike…) and test driving, physics, seats and cargo right away,
while the 3D artist is still making the model. When the GLB lands, drop it in the vehicle_model
group and the blockout visual switches off — no code change. So keep it: removing it would force
every new vehicle to wait for a finished model.
Either way, collision, cameras and the cargo bay are still built; only the visual body and the
procedural tires are skipped when a real model is present. The generated nodes are transient (no
owner), so the .tscn stays minimal — only the root, its script and your designer-placed nodes (the
seats, the GLB instance, door handles…) are saved.
Scene layout at a glance
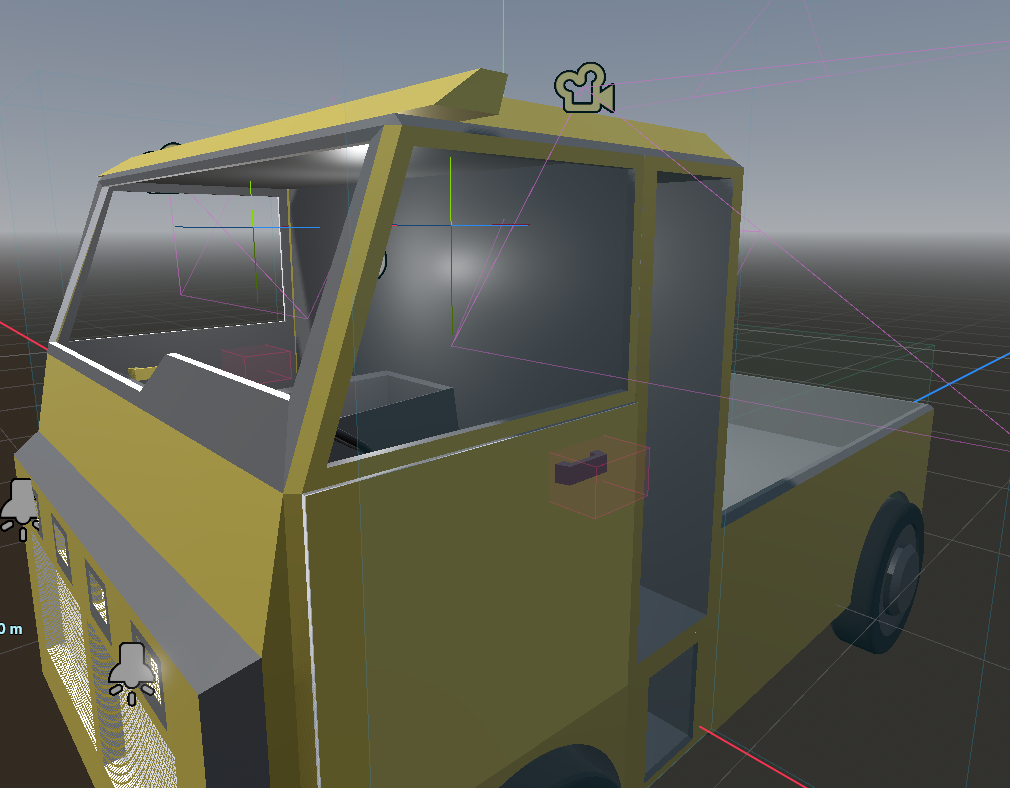
The finished truck — the artist's GLB body wrapped by the Godot rig:
Its scene tree — the GLB Model plus the rig nodes you add around it:
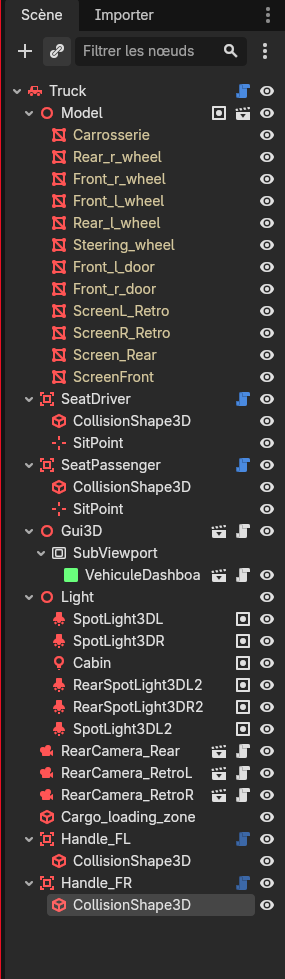
Model(groupvehicle_model) — the GLB: body,*_wheels,Steering_wheel,Front_*_doors and the screen meshes. Everything below it is the rig you add in Godot.SeatDriver/SeatPassenger(VehicleSeat) — the boarding zones (§3).Gui3D → SubViewport →dashboard UI — the in-cab screen (§Dashboard).Light— thevehicle_lightlamps (head / brake / cabin).RearCamera_*— reversing camera + mirrors.Cargo_loading_zone— where dropping loads the bed.Handle_FL/Handle_FR(VehicleDoorHandle) — the door handles (§Doors).
Note the handles are placed at the root (siblings of Model), each on its door's visible handle.
At runtime the code re-parents each one under its door mesh so it swings with the door.
The VehicleBody3D root goes on the vehicle layer with Mask MASK_SOLID (world + player +
vehicle + prop). The seat areas go on the zone layer with Mask 0 (monitoring off — they
are passive), and the door handles on the interactable layer with Mask 0. This split is
what lets a seated player's interaction ray reach the door handle to get out, instead of hitting the
seat zone they're sitting in. Set these in the Inspector; see
Collision layers & masks for the full picture and the truck as a worked
example.
3. Add the seats
For each place, add a VehicleSeat node (an Area3D with vehicle_seat.gd) as a child of
the root, then give it two children:
Truck (VehicleBody3D, vehicle.gd)
├── SeatDriver      (Area3D, vehicle_seat.gd)   role = Driver
│   ├── CollisionShape3D (BoxShape3D)   ← the "press E here" box, beside the door
│   └── SitPoint (Marker3D)             ← where the occupant sits (driver: the camera eye)
└── SeatPassenger   (Area3D, vehicle_seat.gd)   role = Passenger
    ├── CollisionShape3D (BoxShape3D)
    └── SitPoint (Marker3D)
role(inspector):Drivercontrols the vehicle (drive input + HUD);Passengerjust rides along. Set this per seat.- The box (
CollisionShape3D): size and place it where a player on foot stands to board (e.g. left of the cab for the driver). It is the zone that enables E. SitPoint(Marker3D): where the occupant is seated. For the driver it is also the camera eye, so place it at head height inside the cab, facing forward (the vehicle's local-Z).
You don't wire anything: the Vehicle discovers its seats automatically. The seat box is
passive — it never monitors. Instead the player's own detector is the single monitor that
reports when it walks into a seat zone. This avoids every seat of every vehicle running a
broad-phase overlap test each physics frame, and it works identically on client and server.
Standing in a box shows [E] Drive Seat / [E] Passenger Seat at the crosshair; a taken driver
seat shows Driver seat taken instead. The driver gets free mouse look while driving and exits
with Y; the prompt is hidden while seated, and on exit you are dropped beside the seat you used.
A seat refuses a second occupant, and if a seated player disconnects the server frees their seat automatically. The driver/passenger logic lives in the networked path, so test seats in the game (F5), not the standalone bench.
Every seat's occupancy is replicated to all clients (a seats map on the vehicle, alongside
doors), so a taken passenger seat shows as occupied too — not only the driver. Without it a
client couldn't tell a passenger seat was in use and would let two players appear to sit in the same
spot.
Seated poses
A seated player plays a matching animation: the driver holds the wheel (Driving), a passenger
sits (Sitting_Nodding). Remotes see it because the seat state is replicated as a seat:<role>:<n>
event (and unseat:<n> on exit) — see Character animation and
the event-field idiom. A tunable puppet offset lines
the sit pose up with the seat's SitPoint; it shifts the visible body only, so the driver's
first-person camera stays where the seat puts it.
4. Configure the powertrain
On the root Vehicle, open the Drive export group:
- Propulsion Type:
ELECTRIC(single-speed, instant torque) orTHERMAL(automatic gearbox). The inspector shows only the relevant sub-group (Electric or Thermal gearbox). - Tune
engine_power,max_speed_kmh,reverse_max_kmh, steering, brakes, and the wheel / suspension settings. - Mass is the standard
RigidBody3Dmass; Cargo (max_payload, overload) drives the load limiter.
You never edit vehicle_powertrain.gd — the Vehicle copies these settings into it each frame
(so you can tune them live while driving the bench).
See Inspector reference — every @export at the bottom of
this page for the full list of tunables (Drive, Steering, Body/Cab/Bed, Wheels, Real 3D model,
Electric, Thermal gearbox, Cargo, Debug) with their defaults.
5. Register it on the network
A vehicle only replicates if the network layer knows it:
-
Spawn registry — add the scene path to
props_scenein bothserver/client.gdandserver/server.gd:'scenes/vehicles/<category>/<name>.tscn':
preload('res://scenes/vehicles/<category>/<name>.tscn'),(These are plain string paths — if you ever move the scene, update them by hand; Godot's UID rename does not touch string paths.)
-
Replication definition — vehicles use the
vehicleprop type, defined inhorizonserver/ds_genericprops/props/vehicle_def.json(whitelistingposition,rotation,scenename,parent_id,pilot_uuid,steering,speed,cargo_mass,handbrake,mass,headlights,doors,seats). If you reuse thevehicletype, there is nothing to add. A brand-new type needs its own<type>_def.json— see Replication definition files.
A property (or a whole type) that is not whitelisted is dropped silently → the vehicle appears on
the server but is invisible to clients (Object definition not found for type: …). Add it to
the def and rebuild Horizon.
6. Test
- Bench (F6) —
scenes/vehicles/vehicle_bench.tscndrives the vehicle locally (no network): good for tuning the body, suspension and powertrain feel. The bench boards as driver only. - In game (F5) — the full flow: spawn the vehicle, walk into a seat box, E to board as driver or passenger, drive, Y to leave. This is the only place seats and passengers are faithful.
Using a real 3D model (GLB)
Instance the artist's .glb under the VehicleBody3D root and add it to the group
vehicle_model. The blockout visual turns off and vehicle.gd wires the parts by name at
runtime — every part is optional (one that isn't there is simply skipped). The naming / pivot /
UV rules the artist follows are on the Vehicle 3D models page.
Godot's glTF import treats trailing tokens like _wheel / -wheel (also -col, -rigid…) as
node-type suffixes: a part named Steering_wheel is silently turned into a VehicleWheel3D and
renamed Steering (you'll see "VehicleWheel3D should be a child of a VehicleBody3D" warnings).
Our code builds the physics itself, so this is unwanted. On the .glb → Import tab, untick
Nodes → Use Node Type Suffixes (and Use Name Suffixes) and Reimport, so parts stay
plain MeshInstance3D with their full names.
Wheels (any number)
The game finds the wheel parts in the model — nodes already typed VehicleWheel3D, or plain
meshes whose name contains wheel — reads each position, and creates a real physics wheel as a
direct child of the vehicle there, reparenting the visual mesh onto it (so it rides the suspension,
steers and spins). Front vs rear comes from the name (front/rear), else the axle nearest the cab
steers. Tune in the Wheels + Real 3D model groups: wheel_radius, suspension_rest, and
real_wheel_spin_axis (flip it if wheels spin around the wrong axis).
Steering wheel
A mesh named steering_wheel turns with the steering angle — cosmetic, it reuses the already-
replicated steering (nothing new on the wire). It spins around steering_wheel_axis in the mesh's
own local frame (so a tilted column still turns in-plane); steering_wheel_ratio sets the lock-to-lock
feel. Absent → no-op.
(0, 1, 0), not (0, 0, 1) — Blender Z-up → Godot Y-upThe disc's normal (its spin axis) is +Z in Blender, but the glTF export converts Z-up → Y-up, so
in Godot that normal becomes local +Y. So steering_wheel_axis is typically (0, 1, 0) (use
(0, -1, 0) if it spins the wrong way); (0, 0, 1) makes it wobble around the vertical instead. For an
angled column this only holds if the tilt lives in the wheel's object rotation, not baked into the
geometry — see the modeler page: keep the disc flat in local
space, tilt the object, and don't apply that rotation.
Doors (server-authoritative) + handles
State — open/close is decided by the server and replicated to everyone via the doors
property (a {door_id: open} map), so it must be whitelisted in vehicle_def.json (step 5
above). On a change every client plays the Blender clip <door_id>_open / <door_id>_close; a door
with no clip falls back to a code hinge-swing on the mesh named door_id (about door_hinge_axis).
Handles are placed in Godot (like seats), not in the model. Per door:
- Add a
VehicleDoorHandlenode (anArea3D) under the vehicle, on the door's visible handle. - Give it two small
CollisionShape3Dchildren — one on the door's exterior handle, one on the interior side (the handle you'd reach when seated). Place each box just proud of the body surface (see the sightline note below). - Set its exports:
Door Id— the door's mesh / clip prefix (e.g.Front_l_door).Outdoor Shape— the exterior box (used when interacting on foot). Drag the child in.Indoor Shape— the interior box (used when interacting seated). Drag the child in.Open Angle Deg— fallback swing angle (used when the door has no Blender clip).Reverse— swing the other way (fallback) / play the clip backwards (anim). Two doors that should open outward need oppositeReverse.
The handle sits on the interact layer, so the player looks at it and presses E to toggle the
door — no proximity zone, no per-vehicle wiring. Prompt: [E] Open door / [E] Close door.
Operating a handle on foot also plays a short reach-out gesture on your character, replicated to everyone (a non-wheel emote — see Character animation). A driver or passenger toggling a door from inside does not.
The interaction is server-authoritative and side-aware, so you can't open a door through the bodywork:
- The box you aim at must match your side — the outdoor box on foot, the indoor box when seated in that vehicle. Aiming at the far-side box (the one you couldn't reach) is ignored.
- That box must also have a clear line of sight — a foreign wall, the terrain or another vehicle in the way blocks it (the vehicle's own body doesn't count).
Because a vehicle's collision is a coarse convex hull that encloses both boxes, the sightline check
excludes the vehicle itself; the side of the box (outdoor vs indoor) is what distinguishes "I can see
this handle" from "it's on the far side". So place each box proud of its surface and assign the two
Shape exports. Leave them unassigned and the sightline gate is simply skipped (the door opens on look).
Place each handle where the door's handle is when the door is shut. At runtime the code re-parents
it under its door mesh (matched by Door Id), so the handle swings with the door — you can
look at it and press E whether the door is open or closed. (Without this, a handle left on the
body would stay at the shut position and the look-at ray would miss it once the door swings open.)
Door-gated seats — open the door before you can get in or out. Set the Door Id export on
the VehicleSeat to the door that guards it (e.g. the driver seat → Front_l_door). Then:
- Open/close the door (look at the handle + E) from that seat's boarding zone (on foot) or while seated — so a driver/passenger can close it from inside.
- E boards only once that door is open. A closed door shows "Open the door first (aim at the handle)" instead of the board prompt.
- Y leaves only once that door is open — symmetric with boarding, so you can't step out through a shut door.
- A seat with an empty
Door Idboards / leaves directly (no gating).
Both gates are server-authoritative: the client checks them for the prompt, but the server
re-checks on enter_vehicle / exit_vehicle and refuses through a shut door.
Collision (from the model)
The collision is generated by code, never hand-placed in the .tscn. Two sources, in order:
col_*meshes in the GLB (preferred) — the artist ships low-poly convex volumes namedcol_cab,col_bed_floor,col_bed_left… (see the modeler page). Each becomes one convex collider (create_convex_shape()) placed where it sits, and the source mesh is hidden (editor and game); several pieces keep the bed hollow. This matches the real shape — a parametric box can't. We use hand-authored convex pieces rather than automatic convex decomposition on the body mesh on purpose: a few cubes are clean, cheap and predictable, whereas decomposition spits out many messy shapes. Check them at runtime with Debug → Visible Collision Shapes.- Fallback boxes — if the model has no
col_*mesh,vehicle.gdbuilds the parametric chassis + bed boxes from the Body / Cab / Bed exports. With a real model these now follow the model's placement (so they sit under the body, not at the origin), but they remain a rough approximation — good for a blockout, not a finished model. Tune them with Debug → Visible Collision Shapes.
So: for a finished vehicle, author the collision in Blender (col_*); the boxes are just the
no-model-yet safety net.
Collision pieces have no mass — in Godot a collision shape never adds weight (and the visual
meshes never affect physics at all; only collision shapes do). The vehicle's mass is mass (empty)
+ occupants + cargo only (_refresh_mass), so col_* never inflate the load.
They would normally affect the center of mass (a RigidBody auto-derives its COM from its
collision shapes — a big col_cab at the front would pull the COM forward and the truck would
nose-dive). To prevent that, vehicle.gd pins the COM to the wheelbase centre (average wheel
position) plus the Center Of Mass Offset export — so handling stays balanced no matter how the
collision was modeled. Lower its Y for roll stability, or shift Z for a front/rear weight bias.
The generated colliders are invisible by default. To check them:
- In the editor top menu: Debug → Visible Collision Shapes (FR: Déboguer → Formes de collision visibles) — a checkbox, leave it ticked.
- Run the scene (F6 bench or F5). It's a runtime overlay, so it must be enabled before running and only shows while the game runs.
- The colliders draw as cyan wireframes over the truck. You should see your
col_*shapes hug the body (and no oversized fallback box) — proof the model collision is in use. If you instead see one big box overhanging the model, your meshes aren't namedcol_*(so the fallback kicked in).
First-person view = the driver SitPoint
The in-cab camera sits on the driver seat's SitPoint (the same eye point used in game), so it
follows the real model — no blockout dependency. Place that SitPoint at head height in the cab,
facing forward (-Z). The bench (F6) now enters in this first-person view like in game; F4
toggles to the chase camera.
Cargo — loading the bed
Two designer-placed zones drive cargo (no per-vehicle code):
cargo_bay— where cargo sits. Tune it via the Cargo export group (cargo_bay_size,cargo_bay_offset,max_payload,overload_immobilize). It is also the passive zone the player's detector overlaps to count their weight while standing in the bed.Cargo_loading_zone— where dropping is allowed to load (it sticks). Add aCollisionShape3Dwith aBoxShape3DnamedCargo_loading_zone(or assign it to theVehicle's Cargo loading zone export), sized a bit larger than the bay so reaching over the wall counts. Its physics collision is turned off at runtime — it is only a zone marker. If unset, thecargo_baybox is used as a fallback.
The load counts toward max_payload, the overload limiter shown on the dashboard.
- Loading — carry a prop (a crate, a mined rock) and drop it inside the loading zone —
whether you stand in the bed or reach over from outside; the zone (not your position) decides. The
[E]prompt reads[E] Cargowhen dropping would load it (it sticks) and[E] Dropotherwise. The carrier hands it to the truck: the prop is frozen, parented to the vehicle so it rides along, and its mass is folded into the load. The bed never polls — loading happens on drop. - Placed in the bay — a loaded item is tucked entirely inside the
cargo_bay(using its real collision bounds, so any size or off-centre pivot fits) and rested on the bed floor, even when dropped from far / over the rim. - A held prop passes through vehicles while carried, so a held box can't shove or flip a much heavier truck — you load by dropping, not by ramming.
- Retrieve — aim at a loaded item and press E (
[E] Carry); it leaves the load and goes into your hands, like any carriable. - What counts as load:
- the props locked in the bed — each prop's weight is its
RigidBodymass; - on-foot players standing in the bed (their body mass), plus whatever they hold in their hands.
- the props locked in the bed — each prop's weight is its
- A mining rock's mass scales with its size: a whole rock keeps the mass set on its scene
RigidBody(the GameDesigner value); a cut piece weighs that scaled by its volume ratio (a half ≈ half, a quarter ≈ a quarter), so smaller pieces load the bed less. - Over
max_payloadthe HUD showsOVERLOADED; pastmax_payload × overload_immobilizethe vehicle won't move. Another vehicle is never loaded as cargo (no swallowing a truck with a truck). - Rollover — if the vehicle tips past
cargo_unlock_tilt_deg(default 65°), the bed unlocks and spills its whole load (GDD: the lock releases past a certain inclination).
Standing in the bed adds the weight, but walking in a moving bed (riding it on foot) is not supported yet — it needs client-side prediction. A moving truck currently leaves a walker behind.
How the load rides the truck (freeze mode)
A loaded crate must follow the truck rigidly — and it is a RigidBody3D, which the physics engine
places in global space, not by inheriting its parent's transform. So parenting a crate under the
truck is not enough; how it is frozen matters.
A frozen RigidBody3D has two modes:
FREEZE_MODE_STATIC(the default for a frozen body) behaves like aStaticBody: the physics server keeps rewriting its world transform every physics frame. Under a moving parent it stays put in the world while the truck drives off — the "cargo left behind at speed" bug.FREEZE_MODE_KINEMATICis animatable: the body follows its node's transform (parent_global × local), so as the truck moves, the crate rides with it.
The crate is set KINEMATIC on both sides: the server does it when it locks the crate, and each
client does it for the replica derived from the parent — when a prop is reparented under a
Vehicle it switches to KINEMATIC, and back to STATIC when it returns to the world (PropNet.apply_ride_freeze_mode). Nothing extra is replicated for this: the client reads it from parent_id, which already travels.
On top of that, two pins keep it perfectly stuck:
- Server pin — each physics frame the vehicle re-asserts every locked crate's constant local
pose in the bed (
_pin_locked_cargo), so a KINEMATIC body can't drift relative to the moving truck. The replicated local position therefore stays constant. - Client pin — each render frame the prop re-asserts that same local pose
(
PropNet.ride_pin), so the crate tracks the render-interpolated truck without stepping at the physics rate (which would jitter). A direct set, not a lerp.
Turn on Settings → General → Cargo debug to draw a green envelope around every crate that is really locked in a bed (i.e. reparented under the vehicle). An item merely resting loose in the bed gets none — a quick way to tell "stuck" from "just sitting there".
Hand brake
Vehicles spawn with the hand brake engaged (parked), and the driver toggles it with a long press
of Space under 3 km/h (released by throttle). It holds the vehicle still on flat ground and slopes by
braking the wheels and cancelling drift — not by freezing the body (freezing a VehicleBody3D
collapses the wheel suspension, so the wheels sink into the ground). It stays engaged after the
driver leaves. A moving vehicle left with no driver and no hand brake coasts to a stop on its own
(it never keeps driving off). Shown on the HUD and on the dashboard.
Head lights
Head lights are a drop-in like seats: add any Light3D (e.g. a SpotLight3D at the front
facing the vehicle's local -Z) to the group vehicle_light anywhere under the scene — no
code. The driver toggles them with L; the state is server-authoritative and replicated, so every
client sees them. Shown on the HUD ([L] lights) and on the dashboard. The truck ships with two
front SpotLights as the example.
L is contextual: it drives the head lights while seated as driver, and the player's
flashlight on foot — the two never fire at once.
Dashboard — optional in-cab screen
Show live data (speed, RPM, load…) on a screen in the cab using the generic 3D-screen pattern — see GUI on a 3D screen for the setup (SubViewport, ViewportTexture, and the Local-to-Scene / viewport-path gotchas).
Point the Gui3D's node_quad at a screen mesh in the GLB (e.g. ScreenFront, via Editable
Children on the model). Gui3D now applies its SubViewport as a texture by code when the mesh
has no material_override — so a model screen "just works", no hand-made ViewportTexture material.
The mesh still needs clean 0..1 UVs and its front face toward the driver (see the
Vehicle 3D models screen rules). The dashboard is read-only,
so node_area (touch) is optional.
The vehicle-specific part is only the UI script: put vehicle_dashboard.gd
(VehicleDashboard) on your UI scene's root. It finds its owning Vehicle in the tree and shows
the generic Vehicle data each frame (speed, RPM, load, overload, powertrain, transmission) — so it
is reusable by any vehicle, and the Vehicle knows nothing about it. Name the Labels speed,
RPM, Load, Overloaded, Elec_THerm, Transmission, hanbreak, Light (or adjust them in
the script).
Rear-view camera & mirrors
A live camera feed on an in-cab screen — a drop-in (scenes/vehicles/rear_camera.tscn),
reusable and client-only (no render on the headless server). Use it for a reversing camera and
for side / rear-view mirrors (the GDD allows "mirrors or relayed cameras"). Godot has no cheap
real reflective surface, so a mirror is just a camera too.
Setting one up in the editor — select the RearCamera, frame it with the Camera Preview, and
drag the model's screen mesh into its screen slot:
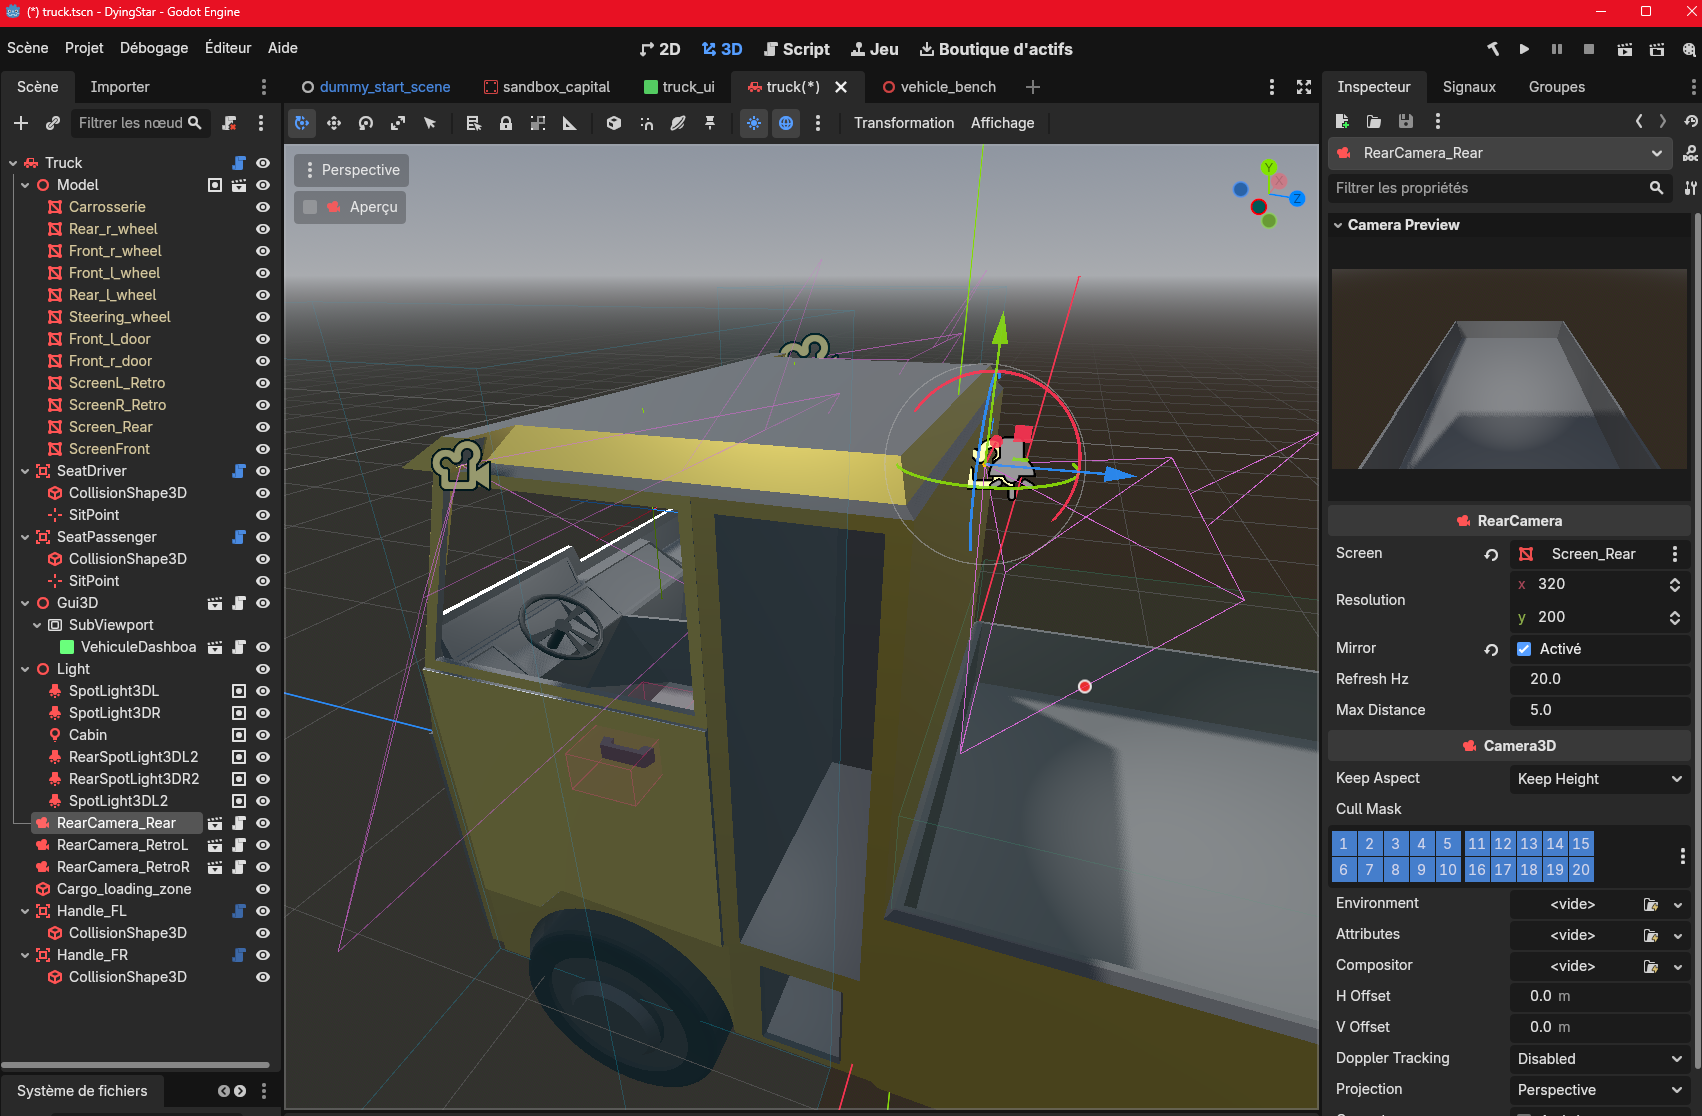
Setup (no code):
- Instance
rear_camera.tscnunder the vehicle. RearCamerais a Camera3D — place and frame it in the editor (gizmo / Preview), at the back looking behind (or at a side mirror, looking back/outward). It never renders to the player's view; a twin camera inside itsSubViewport(sharing the mainworld_3d) copies its pose + fov and renders the feed.- Set the
RearCamera'sscreento the surface that shows the feed. Use either a localMeshInstance3Dwith aQuadMesh, or a screen mesh from the GLB model (e.g.Recul_Screen,RetroL_Screen,RetroD_Screen) — select it via Editable Children on the model and drag it intoscreen. The feed material is applied at runtime and is one-sided (shows on the front face only). A blank screen = the face points the wrong way → fix the normals in Blender (front face toward the driver — see the Vehicle 3D models screen rules), and ensure clean0..1UVs. (Themirrorflag below flips left/right; it does not fix a wrong-facing or rotated face.) mirror: off = a reversing camera (true view); on = a mirror (reverses left/right).resolution: match its aspect to the screen quad to avoid stretching.max_distance/refresh_hz: see Performance below.
Each RearCamera renders the whole world again, so a rear cam + two mirrors = three extra renders.
Two built-in limiters keep this cheap on weak GPUs (the screens still stay live for everyone):
max_distance— beyond this distance from the viewer the feed stops rendering (keeps its last image; it is unreadable from afar anyway).0disables the distance cull.refresh_hz— how many times per second the feed re-renders (default 20, not the full frame rate).0renders every frame.
Also keep resolution small.
Screens power off with the engine
The rear-view screens and the dashboard go dark when the engine is off, and light up again on
ignition — so a parked truck reads as powered-down, not frozen. Each screen reads the vehicle's
replicated is_engine_on() on its own (the Vehicle knows nothing about its screens): a rear
camera swaps its feed for a black image and stops rendering (no wasted GPU) while off, and the
dashboard multiplies its panel to black. Since the engine state is replicated, every nearby player
sees the same on/off. No setup — it's automatic on any screen wired as above.
Inspector reference — every @export
Every knob below lives on the root Vehicle node, grouped in the Inspector exactly as shown.
Listed values are the defaults — truck.tscn overrides some of them. Most apply live (tune
them on the bench, F6, while driving). Changing a dimension (Body / Cab / Bed / Wheels) rebuilds
the procedural blockout; with a real GLB model the blockout visual is skipped, but the collisions,
cameras and cargo bay still use these numbers.
Drive
| Property | Default | Role |
|---|---|---|
propulsion_type | ELECTRIC | Powertrain. ELECTRIC = single-speed, instant torque (EV). THERMAL = automatic gearbox. Switches which sub-group (Electric / Thermal gearbox) the Inspector shows. |
engine_power | 1200 | Base torque per driven wheel. Total pull = this × driven wheels (× gear ratio in THERMAL). Must beat m·g·sin(slope) to climb. |
max_speed_kmh | 45 | Top speed (km/h). |
reverse_max_kmh | 15 | Reverse top speed (km/h). |
torque_response | 2.5 | How fast torque ramps to the throttle (1/s). Lower = gentler launch (keeps a heavy vehicle from leaping off the line). |
brake_force | 30 | Brake force per wheel. |
engine_brake | 6 | Engine braking + rolling resistance applied per wheel while coasting (no throttle, no brake) — without it the truck rolls forever. Keep well below brake_force. |
handbrake_hold | 30 | Parking-brake damping (m/s per s) above the release speed. A real collision impulse exceeds this, so a hit parked truck still gets pushed (then re-settles). |
handbrake_release_speed | 2 | Horizontal speed (m/s) below which the engaged hand brake fully cancels motion — a parked truck must not move from a player bump or a gentle slope. |
drive_mode | ALL | Driven wheels: FRONT (FWD), REAR (RWD) or ALL (4×4). |
| Mass | (node) | Not an @export — it's the standard RigidBody3D Mass on the node (~1 t empty; cargo physically loads on top). |
center_of_mass_offset | (0,0,0) | COM offset (m) from the wheelbase centre. We pin it ourselves (else the col_ pieces drag it forward → nose-dive). Lower Y for roll stability, shift Z for a weight bias. |
Steering
| Property | Default | Role |
|---|---|---|
max_steer_deg | 30 | Maximum front-wheel steering angle (degrees). |
steer_speed | 1.6 | How fast the wheels turn toward the held direction (rad/s). Lower = more progressive. |
steer_return_speed | 3.0 | How fast the wheels re-centre on release (rad/s). A bit snappier than steer_speed. |
steer_speed_falloff_kmh | 80 | Above this speed the steering lock shrinks (toward steer_min_ratio) — agile when slow, stable when fast. 0 disables. |
steer_min_ratio | 0.35 | Fraction of the max steer angle still available at/above steer_speed_falloff_kmh. |
Steering wheel (visual) sub-group — cosmetic only, no effect on driving:
| Property | Default | Role |
|---|---|---|
steering_wheel_ratio | 8.0 | Radians the volant turns per radian of front-wheel steer (real cars ~8–16 lock-to-lock). |
steering_wheel_axis | (0,0,1) | The steering-wheel mesh's own local spin axis (its disc/column axis). Try a cardinal axis until the volant spins in-plane. See Vehicle 3D models. |
Body / Cab / Bed (blockout dimensions, meters)
Only used by (and only editable on) the procedural blockout — a real GLB model replaces the visual. Changing any of these rebuilds the blockout live.
| Property | Default | Role |
|---|---|---|
body_length | 4.6 | Blockout body length. |
body_width | 2.0 | Blockout body width. |
body_height | 0.5 | Blockout body height. |
cab_length | 1.5 | Blockout cab length. |
cab_height | 1.9 | Blockout cab height. |
cab_cutout_size | (2.255, 0.969, 0.744) | Windshield / door opening carved from the body (a CSG subtraction inside the body combiner). |
cab_cutout_offset | (-0.017, 1.454, -2.062) | Position of that cutout. |
bed_wall_height | 0.7 | Blockout bed wall height. |
Wheels
| Property | Default | Role |
|---|---|---|
wheel_radius | 0.55 | Wheel radius (blockout + physics contact). |
wheel_width | 0.35 | Blockout wheel width. |
wheel_visual_drop | 0.5 (0–1.5) | Client replica only: drops the wheel meshes to ~ground level (a replica has no physics, so VehicleWheel3D never lowers them). Tune so the replica's wheels touch. |
wheelbase | 3.0 | Distance between front and rear axles. |
track_width | 1.55 | Distance between left and right wheels. |
suspension_rest | 0.4 | Suspension rest length (how far the wheel hangs below its mount) → ride height. |
suspension_stiffness | 22 | Spring stiffness (a 1 t truck ~20–25). Too high + any ground penetration launches the body. |
suspension_max_force | 15000 | Max force each suspension can push (N). Must exceed the loaded static load per wheel (~5600 N at 2.3 t) with margin, or the bed bottoms out when full. |
Real 3D model (GLB drop-ins)
Optional — present a GLB (group vehicle_model, or named wheel meshes) and the blockout visual is skipped.
| Property | Default | Role |
|---|---|---|
real_wheel_spin_axis | (1,0,0) | Spin axis of a real wheel mesh, in the mesh's local space (its axle). A Blender +Y-up export with transforms applied usually leaves the axle on local X. Change if the wheels spin around the wrong axis (e.g. "on their edge"). |
door_open_angle_deg | 75 | Fallback only (door with no Blender animation clip): instant open angle (degrees)… |
door_hinge_axis | (0,1,0) | …about this local hinge axis. The real swing is normally authored in Blender. |
Electric (propulsion_type = ELECTRIC)
| Property | Default | Role |
|---|---|---|
base_speed_kmh | 25 | Full torque from standstill up to this speed (constant-torque), then torque tapers to zero at max_speed_kmh (constant-power) — the real EV curve. |
motor_max_rpm | 4500 (0–12000) | Gauge RPM at top speed (single-speed, no gears). RPM = motor_max_rpm × speed / max_speed_kmh. |
Thermal gearbox (propulsion_type = THERMAL)
| Property | Default | Role |
|---|---|---|
gear_ratios | [2.5, 1.7, 1.25, 1.0, 0.8] | Per-gear torque multiplier, 1st→last (1st = strongest/slowest). Shifts automatically on engine RPM. |
shift_up_rpm | 3400 | Engine RPM to shift up. |
shift_down_rpm | 1400 | Engine RPM to shift down. |
reverse_ratio | 2.5 | Reverse gear torque multiplier. |
idle_rpm | 800 | Idle RPM (needle floor). |
redline_rpm | 4000 | Redline RPM (needle ceiling). |
Cargo
| Property | Default | Role |
|---|---|---|
max_payload | 1300 | Max payload (kg) before overloaded (load limiter). Empty ~1 t + this = full weight. |
overload_immobilize | 1.2 | Above max_payload × this the vehicle is immobilized (1.2 = +20 %). |
cargo_bay_size | (2.0, 1.5, 3.1) | Size of the cargo-bay box. A massive body that comes to rest inside is absorbed (its mass added once). Also the on-foot bed-walker zone — a player standing inside adds their weight, so fit it to the real bed (too low/large counts someone standing beside the truck). |
cargo_bay_offset | (0.0, 1.0, 0.75) | Centre of the cargo-bay box, relative to the vehicle origin. |
cargo_loading_zone | (unset) | Optional designer box (CollisionShape3D + BoxShape3D) marking where a dropped item may load. Unset → falls back to the cargo-bay box. Its physics collision is disabled at runtime (zone marker only). |
cargo_settle_speed | 0.6 | A dropped body locks into the bed once it slows below this (m/s). |
cargo_unlock_tilt_deg | 65 | Tilt (° from upright) past which the bed unlocks and spills its load (a rollover drops the cargo). 0 disables. |
debug_show_cargo_bay | true | Show a translucent box marking the cargo-bay zone (turn off on shipped vehicles). |
Debug
| Property | Default | Role |
|---|---|---|
debug_color_driven_wheels | true | Tint the driven wheels green (idle wheels stay dark) to see FWD / RWD / 4×4 at a glance (turn off on shipped vehicles). |